Pattern for a "foundation skirt" or Bustle
from the July 1888 issue of Godey's Lady's Book
INSTRUCTIONS AND NOTES:
"Now this part of a toilette is often strangely neglected; we say strangely because the fall of the whole skirt depends upon it. The foundation skirt should be gored, but very slightly. It hangs well when left plain, the upper part being plaited into the wearer’s figure, but if the figure happens to be stout, this very unnecessarily increases the size.
To cut a foundation skirt, four measurements are needed, for width and
length: 1, the length from waist to instep; 2, the length from waist to
heel; 3, the hip girth, taken about 6 inches below the waist; 4, size of
waist.
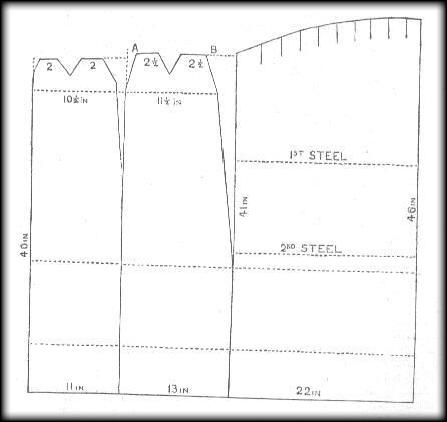
With this article a complete diagram for half a skirt is given, so that by
reference to it, the cutting is very greatly simplified.
If silk is not used, alpaca is the usual foundation material; it is single
width, but wide, often 30 inches, so for a person of average height six
yards will be required. It is more economical to cut the skirt out of
48–inch material, when there is less loss, and 3 3/4 yards is enough by
sewing a piece on each side of the middle gore (see No. 40) to give width
enough at the lower edge. This length of material is for an average figure:
waist, 24 inches; hip-girth (taken over the cushion loosely), from 40 to 46
inches length in front, 40 inches; at the back (in the centre), 46 inches to
allow for cushion and steels. The front breadth being 40 inches long, the
side gores must be 41 inches. No turnings are allowed in the diagram,
half–an–inch must be allowed at each edge for the purpose. There are four
breadths in all, 1, front; 2 and 3, side gores; 4, wide back breadth.
Take the breadth, 40 inches long, and 22 wide; double it in half,
lengthwise, so that the two selvedges (or the edges from which selvedge
bands have been cut) come together. At the upper edge of the straight
breadth plait over 1 1/2 inches, and shave it off to nothing 17 inches
below, thus making a light bias on each side of the front breadth. From the
upper portion, to a distance of three inches, increase the bias of that
portion by plaiting over another 1 ½ inches, diminishing to nothing three
inches below (see doubled front breadth). Thus at the upper edge you have
removed three inches of material from the sides of the front breadth, which
diminishes to nothing seven inches below, and makes a decided curve, not the
mere bias slope three inches below the upper edge. For some figures it will
be found necessary to remove one inch from the centre of the front, making a
seam in the centre of the front three inches or two–and–a–half inches long,
enclosing at the upper edge one inch of the material (half–inch in the
diagram, which is half the skirt) sloping off to a sharp point.
Removing this much, your upper edge is now seven inches long (see diagram).
Four inches is enough for half the front, so remove three inches from the
centre of that half by a seam sloping off the removed portion to nothing
three inches below the upper edge. The front breadth is now finished.
Next cut the side gores. Take two straight breadths 13 inches wide and 41
inches long. At A, plait over one inch of the straight side, and slope it
off to nothing five inches below. From the side B, first remove a piece
three inches wide at the upper edge to bias that side, sloping it off to a
distance of 25 inches from the upper edge. Remove a second piece at B, one
inch at B, sloping off to nothing five inches below. This gives the
necessary curve and bias slope to the side gore where it joins the back. The
upper edge, A B, is now eight inches long, and it should be only five;
remove a three inch point as in the case of the fronts. The back breadth is
a straight piece 44 inches wide. The sides are 41 inches long, the centre of
the back being 46 inches. A smooth gentle curve must be cut to form the
upper edge between the different lengths of side and centre.
The cutting being done, tack the breadths together, easing the curved seams
so that the 40–inch front exactly meets the 41–inch gore, and the sloped
line of the gore at B, nearly meets the selvedge of the back breadth. Sew
the seams by machine after tacking them, and iron them open. The small seams
at the waist must be neatly made and ironed, so that the skirt moulds the
figure, but loosely and easily. The lower edge must be perfectly on the
straight, and measures 2 yards 20 inches all around. There is no need to try
on a skirt if you have the correct measurements. The wide back breadths must
be gauged or plaited at the waist into a space of six inches, half (see
diagram) of course only occupying three inches.
The seams being sewn, plait the skirt in half to mark a line down the
centres of front and back, as in the diagram. Now tear off four breadths of
strong muslin 16 inches wide, plaiting two of the breadths in half. You have
your skirt wrong side out, doubled in half like the diagram lying on your
work–table. Place one doubled breadth on the front breadth, one half lying
over the skirt, the other lying on the table beneath the skirt. Do the same
at the back breadth with the second doubled breadth. The two remaining
breadths fill in the intermediate spaces above and below. The lower edge of
the muslin bands must be entirely on the straight as is the skirt. Cut away
the length of muslin you do not want, and pin the breadths in place, seaming
the pieces together on the bias independently of the skirt seams, letting
the pieces lap over each other and securing them with strong stitches, the
upper edge turned in and hemmed over. The muslin bands reach the upper
dotted line in the diagram, where they are hemmed to the skirt as invisibly
as possible.
Now finish the edge with a false hem of the foundation material, about six
inches wide, after having overcast the muslin to the lower–edge of the
skirt. The false hem being finished, place braid at the lower edge, not in
the ordinary binding style, doubled in half and concealing the whole edge,
but sewn inside the skirt and left quite flat.
On the back breadth mark a line 17 or 18 inches from the lower edge, just
above the muslin lining, and sew there on a tape inside, to hold a steel
(see Fig. 3 of No. 40). Put a second tape in the same way from 10 to 12
inches below the upper edge, making it follow the direction of the first
steel, not the biased waist line.
Cut your lowest steel 16 inches long, the upper one only 12 inches. Pass
them through the coulisses you have prepared of tape, or stout muslin one
inch wide. Before passing your steels mark on the back breadth its exact
centre on the coulisse, and see that those spots come in the centre of your
steels. At each end of the coulisse hem it and sew thereon a stout hook,
which will serve to secure the ends of the steels.
Mounting a skirt at the waist is done in many ways. Sometimes the upper edge
is hemmed with a false hem, through which a tape or ribbon is passed. Or the
front and side–pieces are eased into a ribbon belt, the back being gauged
into the rest of the belt. It must be remembered that at the opening at the
back, which must be neatly hemmed, the belt should lap over itself three
inches to prevent the cushion escaping. The opening should nearly reach the
upper steel. A double set of hooks and eyes must be placed on the belt; one
set first hooks the left edge of the opening to the band on the right, a
three inches from the right edge, this being the waist size, the right edge
lapping over and hooking on to the left of the belt, this three inches being
beyond the waist measure.
Lastly, make the cushion of the same material as the skirt. It should be of sufficient size to keep the skirt from falling inward before the first a steel, as often happens if too narrow and thick, but it must be proportionate to the figure. Our model is six inches deep at the sides, eight inches in the centre. It is always much wider than long, and the upper edge, which is very wide (16 inches in our model), is gauged into six inches of the waistbelt, exactly opposite the centre of the front. The lower edge (18 inches long if straight) is better cut circular, though many make it with sharp corners like the upper edge. The cushion is stuffed, not too liberally, with horsehair.

(c) Copyright 2000.
04/22/2006