Making a Basque Dress from 1914
From the Home Book of Fashions, reprinted in its entirety in The Home Pattern Company 1914 Fashions Catalog (Dover Publications).
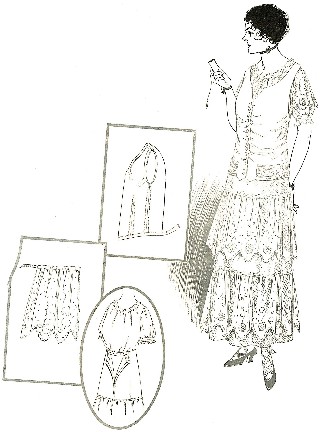
The new Basque, with its long,
easy fitting lines, is hardly to be compared with the old-time garment of
that name, narrow in back and pulled in like an hour-glass at the waistline.
It is a general favorite just now and is youthful and becoming.
The Basque dress shown here is for a young girl or small woman. It opens
down the front and consists of a gathered guimpe, a two-piece skirt with two
deep, straight flounces and an outside Basque.
How to Cut
…In cutting, lay the pieces…on the straight of the goods…
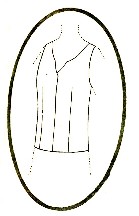
The Guimpe
...Baste pieces together…try on and make the required alterations. If this
guimpe or underwaist is made of net or thin material, under-arms and
shoulder may be finished with French seams. This finish cannot be used with
the armholes to any advantage; it is better to set in the sleeves in the
usual way and bind the seam edges with silk binding or else turn them in
carefully and overcast them.
The bottom of this gathered
underwaist is set into a narrow belt which may be of the material of muslin.
To adjust the belt, put the garment on and draw a tape slightly until the
waist fits easily; arrange the gathers and pin them into place on the tape.
Gather the waist along this line and cut off any extra material. The belt
may be seamed on by machine, then turned and felled down on the wrong side
by hand. Snap fasteners may be used to close it. It has been found very
practical also to use them to fasten guimpe and skirt together; this
prevents the guimpe from working up from the waistline. Sew the sockets
about an inch apart of the outside of the narrow belt as illustrated, and
the balls at corresponding distances on the inside belt of the skirt.
The Skirt
This is a two-piece skirt gathered slightly at the top. The hang of the
skirt depends almost entirely upon the way the material is cut, so very
careful to…[cut on] the straight of the material…
Baste the side seams of the skirt at the seam allowance…stitch, taking care
not to have the tension too tight, if you sew them by machine, or the seams
will draw. If a transparent material such as net or lace is used the seam
edged should be turned in and overcast by hand; if silk or satin, the seams
should be pressed open and the edges bound with seam binding.
Finish the placket by making an underlap of the material about an inch and a
half wide; with thin material this should be made double, but on heavier
stuff it is better to bind the edges of a single thickness. Slip this
underlap neatly under the left edge of the placket and stitch into place;
the right edge should be faced. Arrange patent fasteners along the placket
about an inch apart.
The Inside Belt
The inside belt may be made of silk or cotton belting about tow or two and a
half inches wide or of a piece of cambric; it is fitted slightly by darts
arranged on either side; these are indicated on the pattern. Finish this
belt with hooks and eyes down the front and baste the skirt onto it, having
the ends of the belt at the placket edges, and allowing the skirt to extend
about a quarter to a half an inch above the belt. Try the skirt on and if
properly adjusted turn a quarter of an inch allowance over the belt and
stitch with short, firm, hand stitches; cover this raw edge with seam
binding sewed on flat. Try the skirt on again and turn up the hem; this is
not difficult to do oneself, standing before a mirror; when you are quite
sure that the skirt is even all around turn the hem in at the top and sew by
hand.
The Flounces
It is a simple matter to adjust these straight flounces; in this instance
they are of lace and no finish is required at the bottom. An effective way
of finishing such flounces at the bottom when they are made of silk, satin
or taffetas, is to turn up a hem of about an inch or an inch and a half on
the right side and slip or blind-stitch it down.
…the flounces are shirred over cord a trifle thinner than an ordinary lead
pencil; another attractive way would be to cover the cord with the material
of the Basque, taffetas, satin or whatever it happened to be, and gather the
flounce on to it, this forming a heading.
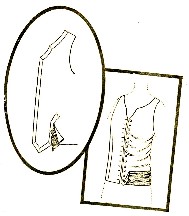
The Basque
A dart-fitted foundation or lining is used in the Basque; it may be of thin
cambric, mull or silk. Quite as much attention should be given the cutting
of the lining as the outside…
Baste the lining on the right side and try on; pin it together with the
fronts meeting. This lining should fit easily and not draw. When all
necessary changes have been noted, turn the lining and baste on the wrong
side; slash open the darts and stretch them ever so gently along each edge;
this should also be done with the fronts. Try on again and if perfect the
darts and center back seams may be stitches, shoulders and underarms being
left open so that the outsides can be sewn in with them.
Turn in the front edges of the lining the width allowed and stitch about a
quarter of an inch from the fold, allowing the edges to remain open; sew the
hooks and eyes on about an inch apart, hooks and eyes alternating down the
fronts. The eyes should be allowed to project enough to hook well and the
hooks be set in slightly so that the front will not gap. The free edges of
the hems may now be turned back and hemmed down neatly over the bases of the
hooks and eyes. Finish the seams of the lining by overcastting the edges or
binding them.
Adjusting the Outside of the Basque
Pin the outside and the lining together at shoulder and under-arm
seams…baste. It is also better to catch the outside of the lining together
at the top and around the armholes with a line of basting. Stitch shoulder
and underarms seams, press open and bind. Turn the edges of the armholes in
and slash wherever necessary so that they will lie flat; seam binding should
be used to cover these slashed edges or a bias strip of the material about a
half an inch in width, sewn on neatly by hand. Turn in the top of the
outside and the lining facing each other, the width allowed, allowing the
outside to extend a little above the lining so as to cover it and hem by
hand on the wrong side. The fronts are turned in and hemmed very carefully
by hand, care being taken that the stitches do not show.
The bottom of the Basque, lining and outside together, is turned up and
hemmed by hand. In order to preserve the straight outside of the Basque a
line of weights, which may be purchased by the yard, is run through the hem
all around the bottom of the garment, catching them here and there to
prevent them from slipping out of place. A narrow bias binding is used to
finish the slashes through which the sash is passed.
Buttonholes
Buttonholes may be worked in the usual way or they may be bound. Perhaps the
easiest thing to do is to sew the buttons to the right side of the Basque,
and close it with snap fasteners set on the inside about an inch and a half
apart.
(c) Copyright 2000.
04/22/2006